 Skip to content
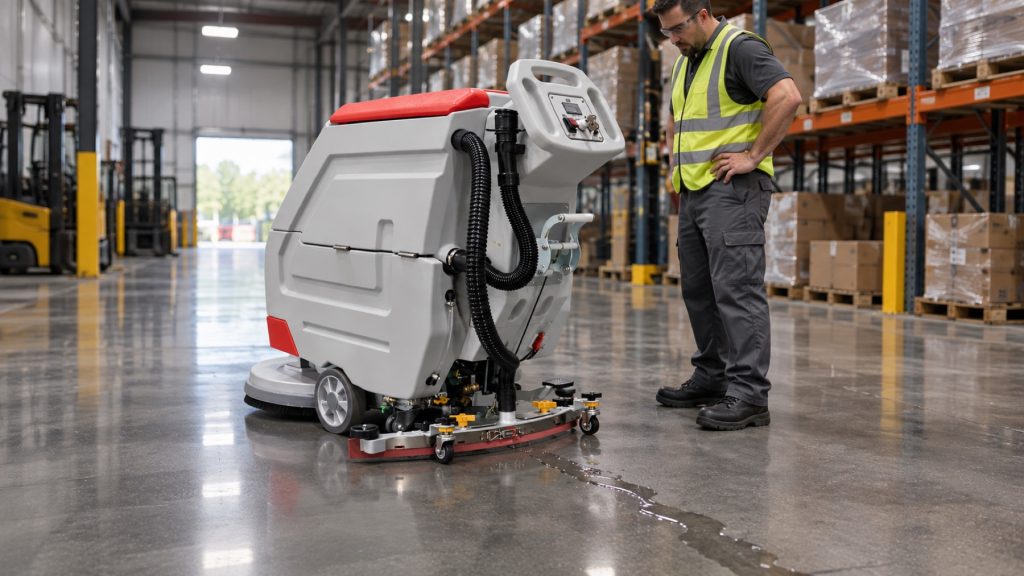

I would stop a scrubber that leaves a wet trail before finishing the aisle. Continuing can spread the problem while making the cause harder to identify.
A floor scrubber may leave water behind because its vacuum function is off, the recovery tank is full or foamy, the squeegee carries debris or wear, or the recovery path has an obstruction or air leak. Start with safe, manual-approved checks before requesting technical diagnosis.
This floor scrubber guide covers visible checks and fault reporting. Match every action to the instructions and layout of the actual machine; stop if they do not match.
What Should You Do Before Checking the Wet Trail?
I want the floor made safe before anyone concentrates on the machine. A small recovery fault can become a larger problem when people walk through it.
Stop cleaning, control access to the wet area, and follow the site’s spill response. Park the scrubber on a level surface and switch it off before inspecting accessible components. Follow the delivered manual’s isolation instructions before touching parts, and keep clear of moving or unsupported assemblies.
First, separate the floor problem from the equipment problem. Keep pedestrians and vehicles out of the affected area according to the facility’s procedures, and arrange appropriate removal of the remaining water. A warning sign alone may not provide the control needed in a busy route. The responsible site team should decide how to manage access and when the area can reopen.
Next, park the machine where the manual permits inspection. The GODWIN walk-behind guidance calls for a level surface and power isolation before maintenance. Do not reach toward a brush, belt, or other moving part while the machine is running. Do not crawl under the machine or rely on an unsupported raised component to create inspection space.
Record what happened before changing settings or cleaning anything. Note whether the problem began immediately, appeared after a period of use, or followed tank emptying or routine cleaning. Observe the control indicators from the normal operating position. If safely available, record the wet pattern from outside the affected area. A short description can preserve evidence that disappears after the floor is dried.
Stop the investigation and refer the machine for qualified attention if there is damaged wiring, liquid entering protected electrical areas, a burning smell, unusual heat, smoke, or abnormal noise. Follow the site’s emergency arrangements where necessary. Repeatedly restarting the machine is not a useful way to investigate those symptoms.
For an ordinary water-pickup problem with no such warning signs, proceed only to checks the operator is trained and authorized to perform. If the relevant manual is missing or does not match the controls, obtain the correct instructions before continuing.
What Does the Water Pattern Tell You?
I use the wet pattern to organize questions, not to name a failed part. Similar-looking trails can come from different points in the recovery system.
A narrow streak, a broad wet path, and water appearing mainly around turns are useful observations, but none proves a single cause. Record where the water appears, when it begins, and whether the vacuum function is selected. Use that information to guide inspection and service reporting.
Look at the pattern that was already left before the machine stopped. Do not create a larger wet area simply to improve a photograph. Describe whether the water forms a line, an uneven band, scattered patches, or a broad trail. Note whether it appears behind the recovery assembly or seems to come from another visible location on the machine.
| Observation | Useful detail to record | What it does not establish |
|---|---|---|
| Narrow streak | Position relative to the cleaning path | That a blade must be replaced |
| Broad wet trail | When it started and vacuum control state | That the vacuum motor has failed |
| Wet patches near turns | Route and floor condition at that location | A universal speed or angle setting |
| Water beneath a parked machine | Visible location and whether it continues | That the recovery system is the only source |
Compare the location with the floor itself. Joints, changes in surface texture, or uneven areas are relevant context for the reviewer. Record those features without assuming that the machine can or should overcome them through more pressure or a different setting. A machine that behaves differently in one location may need both equipment review and application review.
Timing is equally useful. A problem that begins after the recovery tank has filled directs attention to different observations than a problem present from the first pass. A recent cleaning or service action is also worth reporting, but it does not prove that the action caused the fault.
Treat this record as a starting point. Do not order a blade, hose, or motor solely from the trail’s appearance. The same visible symptom can involve debris, a tank condition, a cover, a connection, or a component needing technical diagnosis. Combining the pattern with the following low-risk checks gives the service team a more useful account than 鈥渢he floor is wet.鈥�
Could the Vacuum Control or Recovery Tank Explain the Problem?
I would check the operating state before assuming the vacuum motor is broken. An unselected function or a full tank can interrupt recovery without proving motor damage.
Check the labeled vacuum control and the recovery tank condition using the actual manual. A full or excessively foamy recovery tank can explain weak pickup. Drain and clean it only through the approved procedure, and do not bypass a shutoff device or continue operating with unresolved foam.

Start with the labeled vacuum function, distinct from the brush function. The brush may operate while water recovery is not selected. Confirm the intended control position in the delivered instructions. If the function was off, correcting that operating state may be relevant, but do not restart until the inspection is complete and normal operating conditions have been restored.
The GODWIN walk-behind manual describes a recovery-tank condition that cuts vacuum power when the tank becomes full. This makes the tank level an important check. It does not mean every loss of suction is a normal tank-full event, nor does it establish the exact protection arrangement on a differently configured machine. Follow the labels and documentation supplied with yours.
Excessive foam is another condition to report. Record the cleaning product used, its stated dilution, and whether the product or preparation method recently changed. Do not add a stronger chemical mixture or an unapproved additive to solve the symptom. Compatibility and dosing require the approved equipment and chemical instructions; there is no universal concentration that this article can prescribe.
Drain the recovery tank at the site’s designated, approved disposal location using the manual’s procedure. Clean only the areas identified for operator maintenance. Afterward, ensure the drain closure and tank cover are restored as instructed. A rushed return to operation can leave an unrelated closure problem unresolved.
If the machine still indicates a tank problem after permitted cleaning, or a sensor appears damaged or behaves abnormally, stop and request service. Do not hold a float down, bypass a sensor, or change electrical connections to keep cleaning. Tank protection belongs in the diagnostic record, not outside the operating system.
What Can You Check on the Squeegee Without Adjusting It?
I would look for visible debris before changing the squeegee setup. An unsupported adjustment can hide the original symptom and introduce another variable for the service team.
With the machine safely stopped and isolated as instructed, inspect the accessible squeegee for debris, visible wear, damage, and an obviously incorrect position. Remove only accessible debris through the approved cleaning method. Blade reversal, replacement, alignment, and pressure changes require the matching instructions and confirmed parts.

The squeegee guides dirty water toward the recovery path. Its condition matters, but a wet streak does not automatically mean that its rubber has reached the end of its life. Begin with what can be seen safely: trapped debris, an uneven-looking edge, cuts, or another visible change. Take a photograph before cleaning if it will help describe the condition.
GODWIN troubleshooting guidance supports removing accessible debris and observing the assembly’s position. This is a narrower task than dismantling the assembly or setting its geometry. Keep fingers clear of pinch points and do not reach into an area that requires lifting or supporting the machine. If access is not straightforward under the approved instructions, stop and ask for assistance.
| Visible finding | Low-risk response | When to request help |
|---|---|---|
| Accessible debris | Remove through the manual-approved cleaning method | Access requires dismantling or unsafe reach |
| Worn, cut, or distorted edge | Photograph and identify the machine | Part choice or replacement procedure is unconfirmed |
| Assembly looks out of position | Compare with the delivered instructions | Alignment or mounting condition is uncertain |
| Repeated streak after cleaning | Record the result of the permitted check | The cause remains unresolved |
Do not apply a generic blade angle, down-pressure value, or adjustment sequence found for another machine. The mounting arrangement and required setup must match the actual equipment. Likewise, do not assume that every blade can be reversed or that a similar-looking replacement has the correct dimensions and material.
After an approved cleaning action, restore the assembly according to the instructions before considering a controlled check of performance. If a part is visibly damaged or the mounting arrangement is uncertain, keep the machine out of operation until it has been reviewed. A clear photograph and model identification are more useful than experimenting with several adjustments at once.
Could a Hose, Cover, or Filter Be Interrupting Recovery?
I would follow the visible recovery path instead of jumping straight to the motor. A loose connection or dirty service item may deserve attention before protected parts do.
Inspect only the accessible recovery hose, tank cover, drain cap, and operator-serviceable filter identified by the manual. Look for disconnection, visible damage, debris, or an unsecured closure. Approved cleaning or reconnection may be appropriate; damaged parts, inaccessible obstructions, and suspected vacuum faults need qualified diagnosis.

Follow the visible route from the squeegee connection toward the recovery tank. Note a hose that is disconnected, a visible split, or a connection that does not appear seated. GODWIN troubleshooting guidance permits reconnection of an undamaged hose as a low-risk action when the actual arrangement matches the instructions. It does not authorize improvised repairs to damaged hose or uncertain fittings.
Inspect the accessible tank-lid sealing area for debris and visible damage after applying the manual’s safe inspection procedure. Check that the cover and drain cap are secured as specified. Do not compensate for a damaged seal with additional force, improvised adhesive, or an unapproved replacement. Record the condition and obtain the correct part or service guidance.
Identify a filter or screen before touching it. 鈥淔ilter鈥� can refer to different items, and the solution-water filter is not interchangeable with a recovery-path service item. Clean a component only if the manual identifies it as accessible for operator maintenance and gives a procedure that matches the machine. If the label or location is unclear, send a photograph for identification instead of removing it.
Do not probe an unseen obstruction with a tool, open the vacuum motor, or remove protected electrical covers. Similarly, do not transfer detailed procedures from another brand. Tennant’s T600e troubleshooting guide lists several recovery-path causes for trailing water, illustrating why the symptom needs systematic diagnosis. Its service instructions belong to the models it names.
If visible cleaning and closure checks do not resolve the issue, preserve the observations and stop changing the machine. The next step is a qualified review of the actual configuration, rather than progressively deeper disassembly by trial and error.
When Should You Stop Checking and Contact GODWIN?
I want a service request to show what was observed and what was checked. That helps keep the next decision tied to the actual machine and symptom.
Contact GODWIN when approved external checks do not restore pickup, when parts are damaged, or when instructions do not match the machine. Send the model and serial information, wet-pattern photos, tank observations, control indicators, and a record of checks. Stop immediately for electrical or other abnormal warning signs.
There is a clear limit to operator troubleshooting. Cleaning an accessible item according to the manual is different from diagnosing a motor, sensor circuit, controller, or hidden obstruction. If the next step requires tools, panel removal, electrical testing, or uncertain component adjustment, ask the appropriate service team to review the case. Do not bypass protection to finish the shift.
Prepare a short record rather than sending disconnected images. Identify the machine from its nameplate and include the order information when available. Explain when the problem began and whether anything changed beforehand, such as the cleaning product, floor area, or routine maintenance. State what was observed without labeling an unconfirmed part as defective.
| Service information | What to include |
|---|---|
| Machine identity | Model, serial/nameplate photo, order reference if available |
| Symptom | Wet-pattern location, timing, affected floor area |
| Operating observations | Vacuum control state, displayed indications, unusual sound |
| Tank condition | Level, visible foam, cleaning product and stated dilution |
| Checks already completed | Only actions actually performed and their results |
| Visible components | Safe photos of squeegee, hose, lid, and relevant accessible item |
Do not run the machine solely to record a fault that could create another hazard. Existing observations and photographs of the stopped machine can be sufficient for the initial request. If further evidence is needed, obtain instructions appropriate to the configuration and site conditions.
After a permitted correction, any return to operation should follow the manual and site procedures in a controlled area. Stop if water remains excessive or the symptom returns. Inspect the resulting floor condition before reopening access; a completed check is not a promise of a fully dry floor on every surface.
Ask for confirmed part identification before ordering a blade, seal, hose, or other replacement. Similar appearance and a shared model family do not establish compatibility. Send the collected information to GODWIN so the issue can be reviewed against the delivered machine, rather than treating a generic troubleshooting article as repair authorization.
Conclusion
Control the wet area, check only approved accessible items, and record the results. Persistent water pickup problems need configuration-specific diagnosis before further operation or replacement parts.


 English
  Español
  Français
  العربية